Monday, August 4, 2014

Going Loopy for Performance (C#)

I may have written about this before, and if so, I apologize.  Wait, no I don't.  I couldn't find it and this blog is for me anyway.  I retract my apology.  Anyway, if you've ever wondered whether your loop is as fast as it can be, I have some answers for you.

I read one time that a for loop is faster than a foreach loop in C#.  I can buy that, I suppose.  But in the same article it said that iterating backward through a for loop is faster than iterating forward and I had a hard time getting on board with that.  So I wrote some tests.  That author was right.

I wanted to test a variety of options, so I did.  That's how I roll.  I ran each test over 100,000,000 iterations.

The first test was a regular for loop:

...and the results:


Next up I did the same thing but without previously specifying the size of the loop (I use .Count as the upper limit of the loop):

...and the results:


You can see that of the two options, it is slightly faster to set the upper limit in a variable.  "Slightly" here meaning 11 milliseconds over 100,000,000 iterations, or .00000011 milliseconds per iteration.

Moving on.  Next we have the reason for my testing in the first place: the reverse for loop:

...and the results:


Whoa!  That's a bit of an improvement.  37 milliseconds over 100,000,000 iterations (compared to our previous best time), or .00000037 milliseconds per iteration.

This time the reverse loop without a variable:

...and the results:


Based on the earlier results of the forward for loop, this makes sense.  Next was a foreach loop over a list:

...and the results:


Wow.  That's a significant degradation.  Our previous worst time (a forward for loop with a variable as our upper bound) was 240 milliseconds.  The foreach on a list (which is, in my opinion, the easiest loop to write) takes nearly twice as long to run.

Last up is a foreach loop on an array instead of a list:

...and the results:


The overall results certainly point to a reverse for loop with a variable as the lower bound is the fastest we can iterate through an array.

BUT WAIT, THERE'S MORE!  I found this last bit while I was writing this up.  It's an alternative way to do a decrementing for loop that's actually slightly faster than anything else up there.

...and the results:


I learned a couple of lessons on this one.  First, don't always go with the easiest thing to do because it may not be the best thing to do.  Second, minor functions can have major performance implications.  In this example, I just incremented a variable during the iteration, but in a real world scenario I may do anything from build a complex object to make a service call.  This basic example showed us a difference of 279 milliseconds over 100,000,000 iterations.  That is a really small number per iteration, but keep in mind that the only thing we were doing was incrementing a counter.  If we had been doing any real work that would have been a major performance hit.

Sunday, August 3, 2014

Tracing with Unity

One of the most consistent issues that comes up with software is the need to improve performance.  Even if your application is really fast 99% of the time, someone will want you to improve it at some point.  That's just a fact of life.  The problem is that it's really hard to improve the overall performance of your application if you don't know where the performance is lacking.

I once had a boss who, upon learning that the performance of the new application was not to his standards, demanded that we fix it immediately.  When we pressed him for what was slow he answered "all of it" and "just the whole thing".  We said "let us put some logging in place so we can identify which parts are too slow and then we'll fix it", which was met with "no, just fix it now".

Ever since that incident, I've made it a point to build in a tracing feature that can be switched on or off with a small change to the configuration file.  Recently (as in, two days ago) I found that the old way of tracing wasn't working for me anymore and I had to figure out how to do it all over again.  Here is the fruit of my labor.

First, create the TraceCallHandler class:


Here's some more detail on that one:


The Invoke method is the one that actually interrupts the call.  You can see that all we're doing here is building the arguments list, getting the name of the method being called (including the type in which it's declared in case you have the same method name in multiple places), and starting a stopwatch around the actual method call.  We let the method do its thing, then log the whole shebang on a new thread.


I struggled with this one for a while, but ultimately settled on this.  Basically, I'm trying to see what parameters were used to call the method being executed.  This is helpful when the parameters are primitive types, but if a complex object is passed, it doesn't tell me a whole lot.


Basically at this point we're just passing the values we've collected into a stored procedure so we can review the data when we're ready.  And on that note, here's the stored procedure:


Aaaaaaand the table that stored procedure writes to:


To use the trace attribute all you have to do is add it as a decorator to the interface that has the methods you want to trace.  In this case we're going to trace all methods on the IAboutManager class:


But that'll only work if we configure tracing back in our Unity container.  Like this:


And then we have to configure the actual trace on the IAboutManager interface, like this:


And that's it.  That little bit of code (OK, it's a lot of code, but it did all fit in a single post) will enable tracing with two values from the web.config set to true.  Oh, I forgot that part.  Here you go:

Monday, June 23, 2014

More Angular .NET Routing

This is a quickie to expand on a couple of things I mentioned here.

In that other post I mentioned that you'll need a controller for each page if you want your users to be able to navigate to them directly. That's true, but you don't need a separate view for each one.  What I do instead is redirect every action method for every controller to the same view (~/Views/Home/Index).  That way the Angular routes can take over and everything will work the way you want without a bunch of clutter in your solution.


The next thing is a bit of a correction, sort of.  In the last post I said you should replace @RenderBody() with something else.  Well, I had to create my application anew and that little bit really caused me some trouble.  It now appears you don't want to remove @RenderBody() at all because that will cause some issues in your site.  I'm not issuing a formal change until I can get back to that original application (on my other computer) and try to figure out why it works there and not here.  In the meantime, you can do this instead of following step 22.


There's bound to be more little things I find so I'll try to keep things updated as much as possible.

Thursday, June 19, 2014

IE(h)8

So you just settled in to your new job and you got a support ticket that says "the textbox is jumpy".  Feeling sure of yourself, you go straight to the control in question and immediately start trying to reproduce the error.  Right away you notice the control is not a "textbox", but a "textarea" and you store that little nugget for later.  You open Chrome and start hammering away on the textarea trying to make it "jump" to no avail.  Being someone who is particularly thorough, you call the tester and ask what they were doing when they saw the bug.  After a bit of back and forth the tester finally admits he was testing in IE.  Ah, maybe that's the problem.

So you open IE on your machine (which was built after Castro retired (pay attention, that's important)) and try to reproduce the bug there.  Still with no way to reproduce the issue, you pay the tester a visit.  You immediately recognize that one of your worst fears has come true.  The tester is using an old version of Internet Explorer.  Specifically, he's using IE8.

OK, fast forward a few hours.  You've pulled out 30% of your hair, involved two other developers, one business analyst, and a partridge in a pear tree.  The partridge isn't particularly helpful, but the pears are delicious.  You still can't find anything.  You finally consult the Mighty Internet and as you type "IE8 textarea" Google (because you switched back to Chrome, because of course you did) helpfully auto populates the most commonly searched terms with... "scroll bug".

The first result of that search takes you here, where the very helpful author explains that you're not crazy and neither is your tester.  Microsoft just (surprise) released something with a really-annoying-but-not-commonly-encountered-bug in it.  The fix is simple and everyone is happy.

Except your hair follicles.  They're super pissed at you.

Wednesday, June 18, 2014

Angular.NET Routing

Well, hello again.  In this post I'm going to explain how to set up routing with Angular routes to implement a Single Page Application (SPA).  A SPA may not be best for your needs, but I believe it's helpful to know how to do something (or at least that it's possible) before you need to actually do it.

First things first, if you haven't read the first part of this post, you may want to do that before you continue.  Even if you're already familiar with AngularJS and .NET, I created a sample application in that post that I'll be expanding in this post.

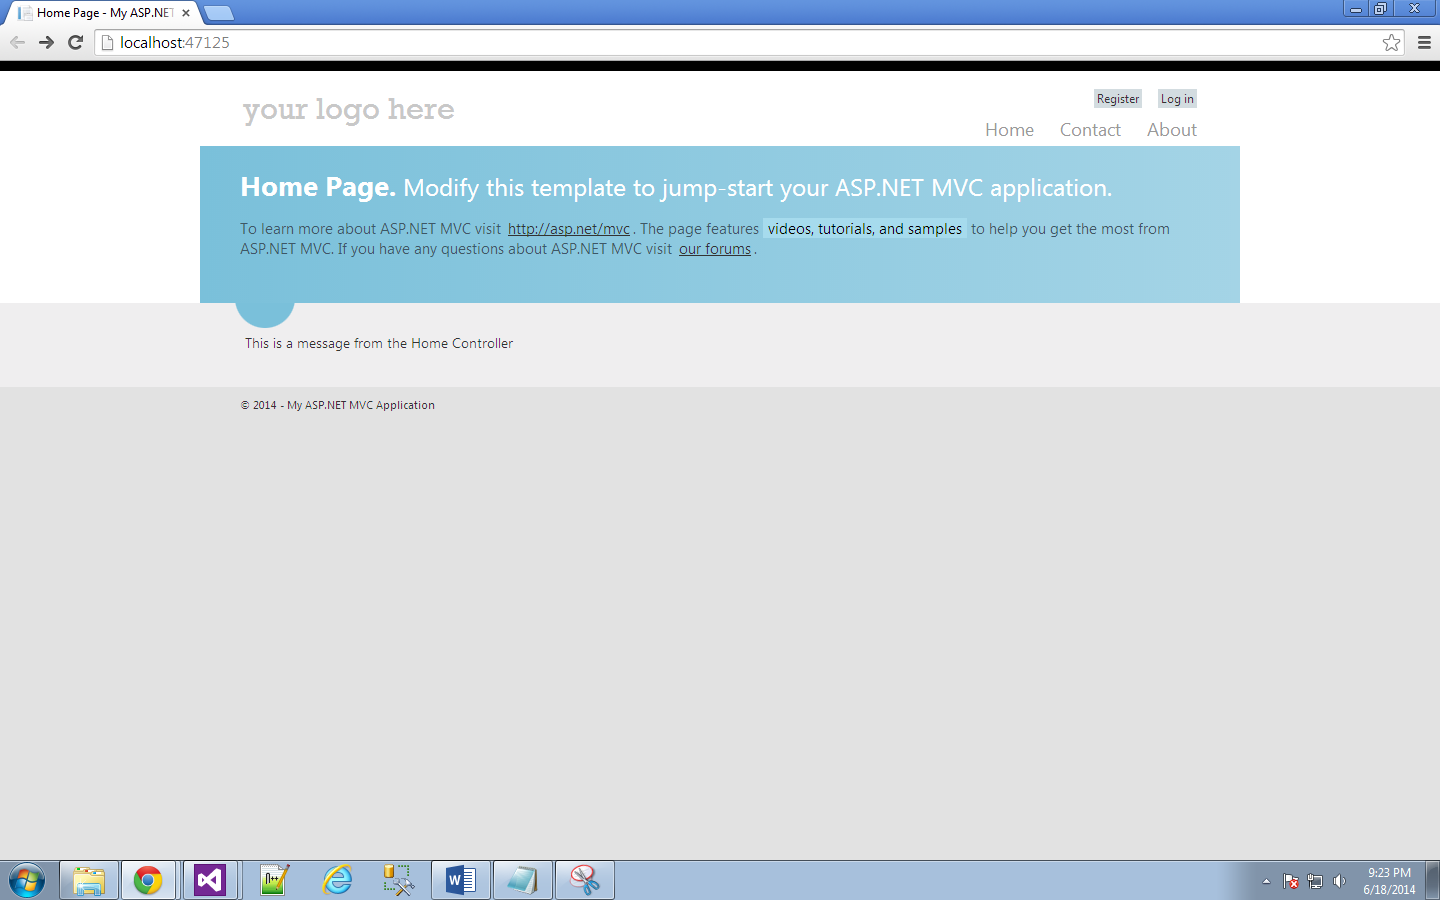
One really important note before we jump into this: if you want people to be able to hit each page directly in a SPA, you'll still need to create .NET controllers.  For example, we're going to route everyone who hits http://localhost:47125 to Pages/Home.html, but if we don't have a .NET controller for /Home/Index the user will get a 404 error.  I don't cover that part in this guide because it's late and I want to go read my book before I go to bed.  Don't laugh... seriously, I can still hear you.  What, a guy can't read before bed?

  1. In the last post, we only added AngularJS Core from NuGet.  This time we're going to add the full blown Angular suite.  Follow steps 4 - 7 in the last post, but when you get to step 8, choose "Angular JS" instead of "AngularJS Core"
    1. When you do this, you should get a couple of warnings that the file already exists; that's OK, go ahead and replace the current file with the new one
  2. Open the file you created in step 16 of the last post, "angular-start.js"
  3. Inside the brackets add "'ngRoute'" (with the single quotes around it, but not the double quotes)
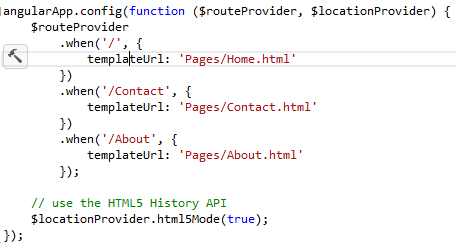
  4. Beneath that, add what you see below
  5. There is something very important to note here: I'm not routing to "Views/Home.cshtml" or "Home[Controller]/Index".  We're going to create a Pages directory and use that, otherwise (in my experience at least) your .NET routes will interfere with your Angular routes
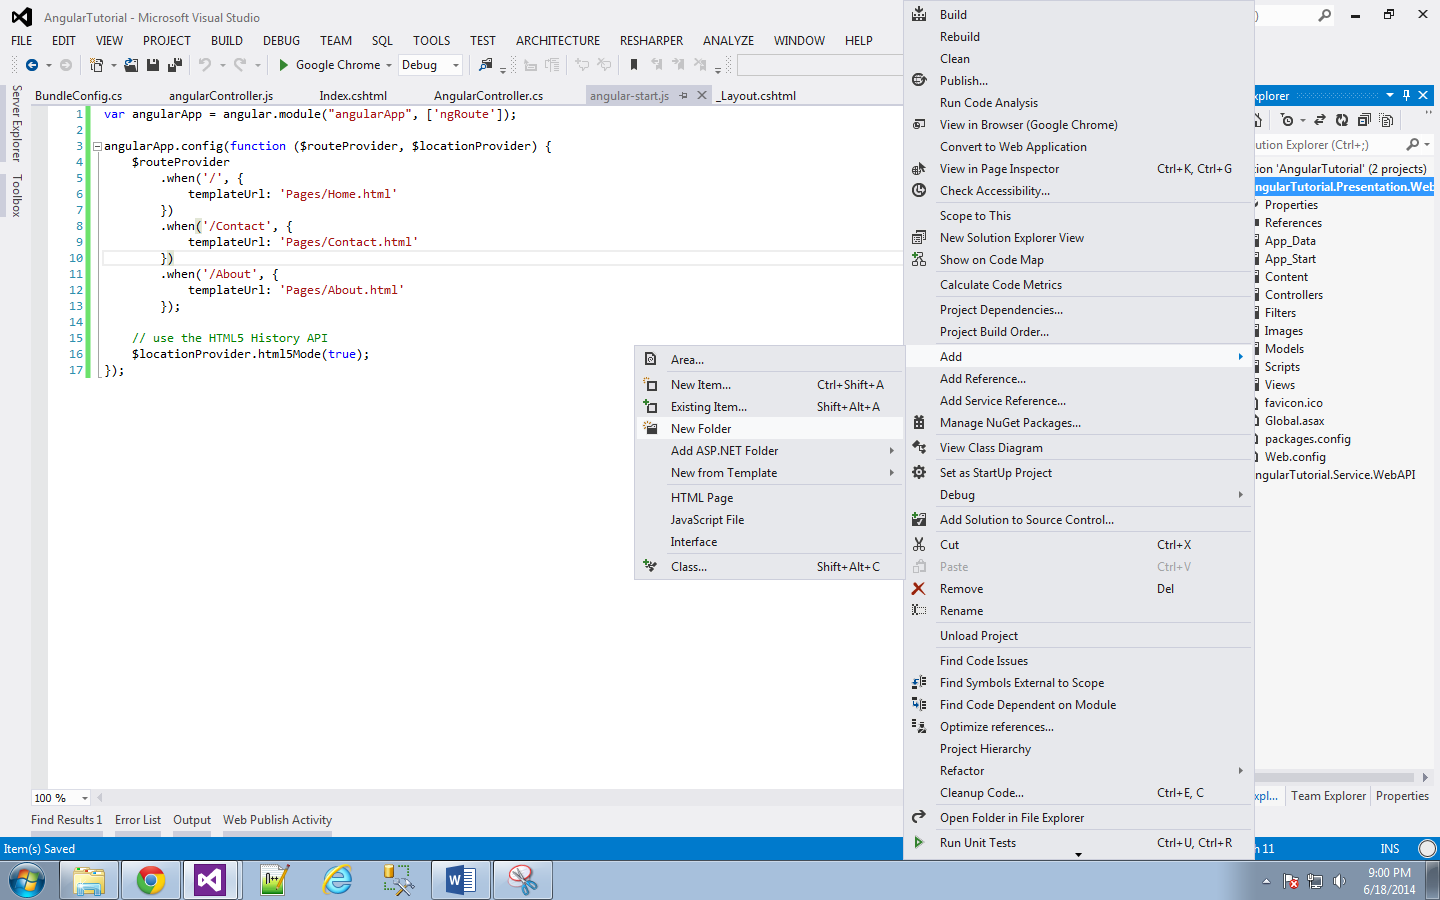
  6. Right-click "AngularTutorial.Presentation.Web" and choose "Add > New Folder" from the popup menu
  7. Name the folder "Pages"
  8. Right-click the new "Pages" folder and choose "Add > New Item..." from the popup menu
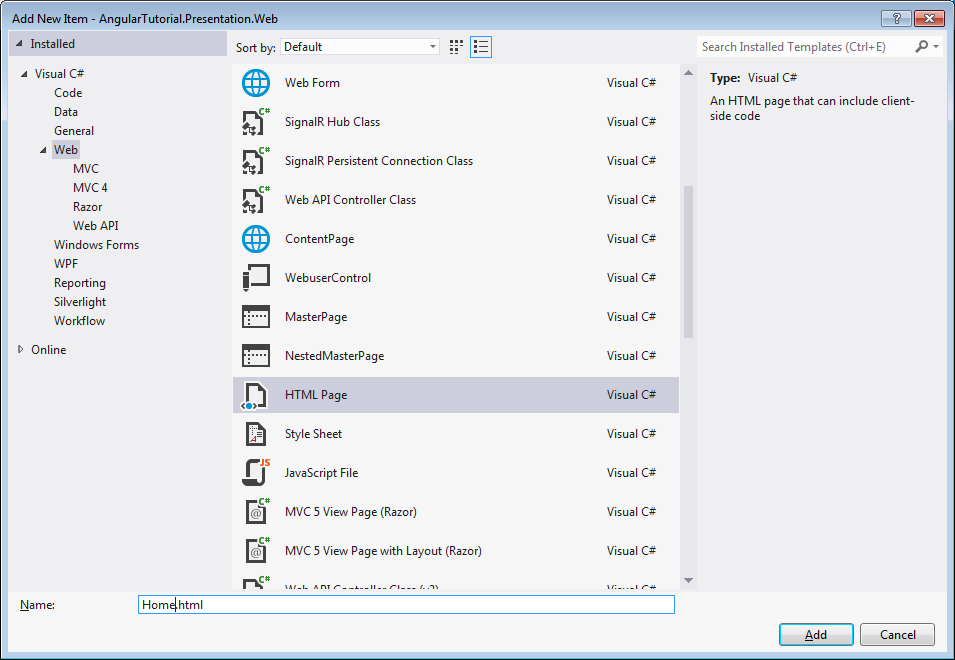
  9. Scroll down the list of items you can add and click "HTML Page"
  10. Change the name to "Home.html"
  11. Click the "Add" button
  12. Repeat steps 8 - 11 of this tutorial twice, once for "Contact.html" and once for "About.html"
  13. Follow steps 28 - 33 in the first tutorial three times, creating "contactController.js", "aboutController.js", and "homeController.js"
  14. Copy/paste the contents of "angularController.js" into each of the three files you created in step 13
  15. Change the name of the controller in each of the files you created in step 13 to match the name of the file
    1. For example, change "angularController" to "homeController" in the homeController.js file
  16. Change the message to something unique for each controller
  17. Expand "AngularTutorial.Presentation.Web > App_Start"
  18. Open "BundleConfig.cs"
  19. In the bundle you created in step 37 of the first post, add the three new controllers you created in step 13 of this post
  20. In the same bundle, add the "angular-route.js" file that should have been included in your project in step 1
  21. Expand "AngularTutorial.Presentation.Web > Views > Shared" and open "_Layout.cshtml"
  22. Replace @RenderBody() with this
  23. In the same file, locate the ul with id "menu" and remove the 3 default tags
  24. Insert these tags where you just removed those others
  25. Notice the path for each of them corresponds to the routes you created in step 4
  26. Follow steps 40 - 43 of the first post

Monday, June 16, 2014

Angular.NET

OK, so the title is a bit misleading.  There is no such thing as Angular.NET (as far as I know), but that doesn't mean we can't mash up AngularJS with ASP.NET to make some really neat applications.  I had a bit of trouble getting started and I couldn't find a comprehensive tutorial anywhere so I put one together.  I even used pictures!

This tutorial is intended to walk you through every tiny step so it may seem tedious at times.  Just go with it.  Or scroll past the parts you already know and get to the good stuff.  I just wanted to be really thorough so next time I start something from scratch I don't have to wonder at all about what I did last time to make it work.

There are a couple of items to note before we jump in.  First (and possibly most importantly), all file names are arbitrary.  If I say "Create a file called angular-start.js" and you want to call it "friggafrompton.js", that's fine.  But later when I reference "angular-start.js", you'll have to remember you named it "friggafrompton.js" and make the appropriate adjustments.  Secondly, the reason I'm starting with a blank solution is for future enhancements to this application.  If you want to just create a new project, that's fine, but again, you're responsible for remembering you did that later.  Next, when you see a word inside brackets, it references a key on the keyboard. So [Enter] means the Enter key on your keyboard.  When you see something in quotes and I tell you to type it somewhere, don't type the quotes.


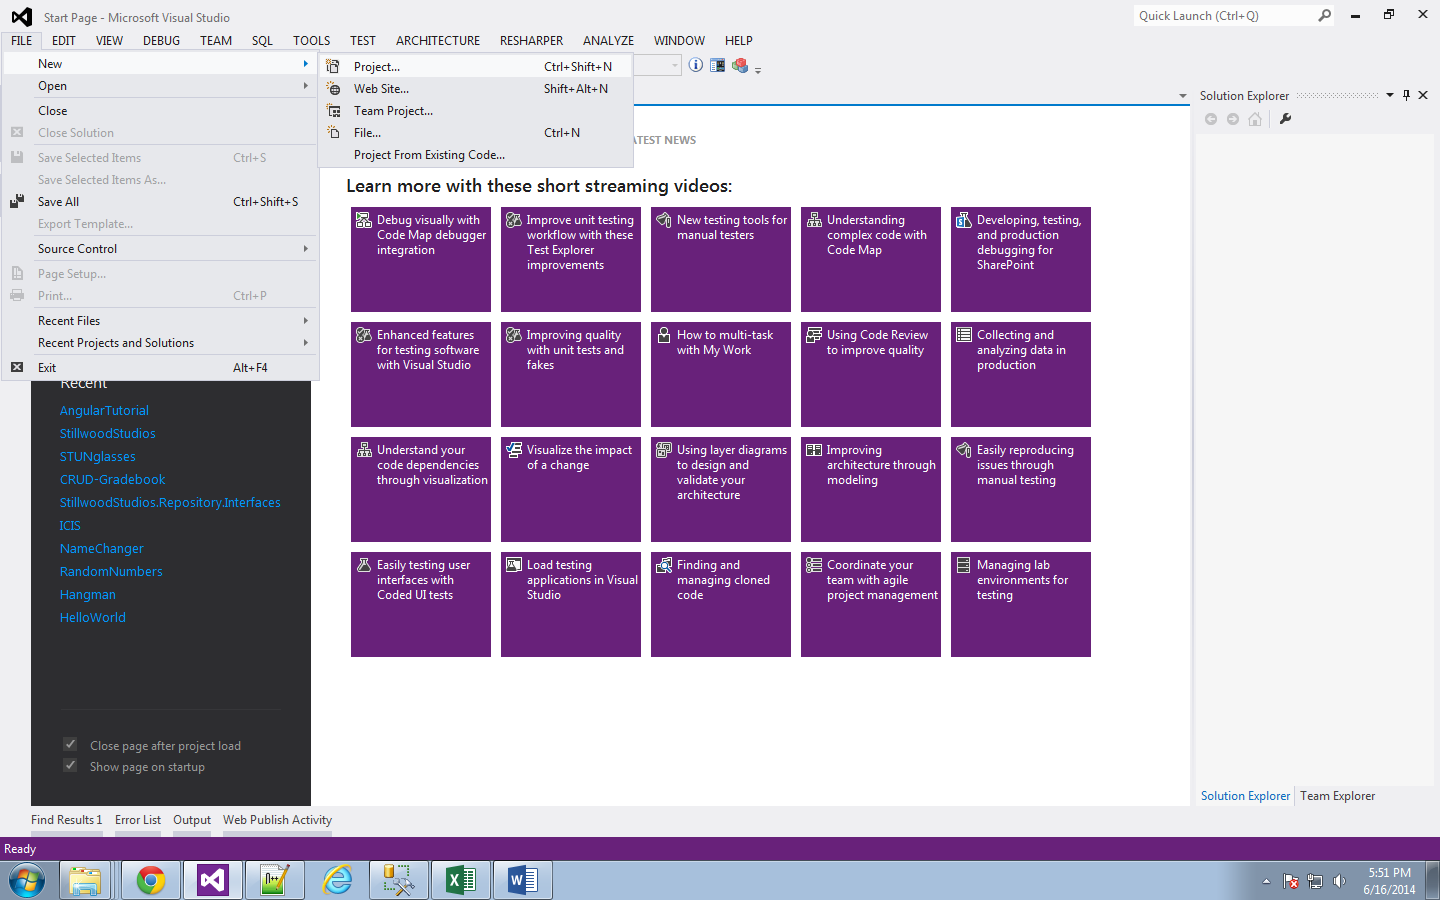
  1. Open Visual Studio (I use VS 2012)
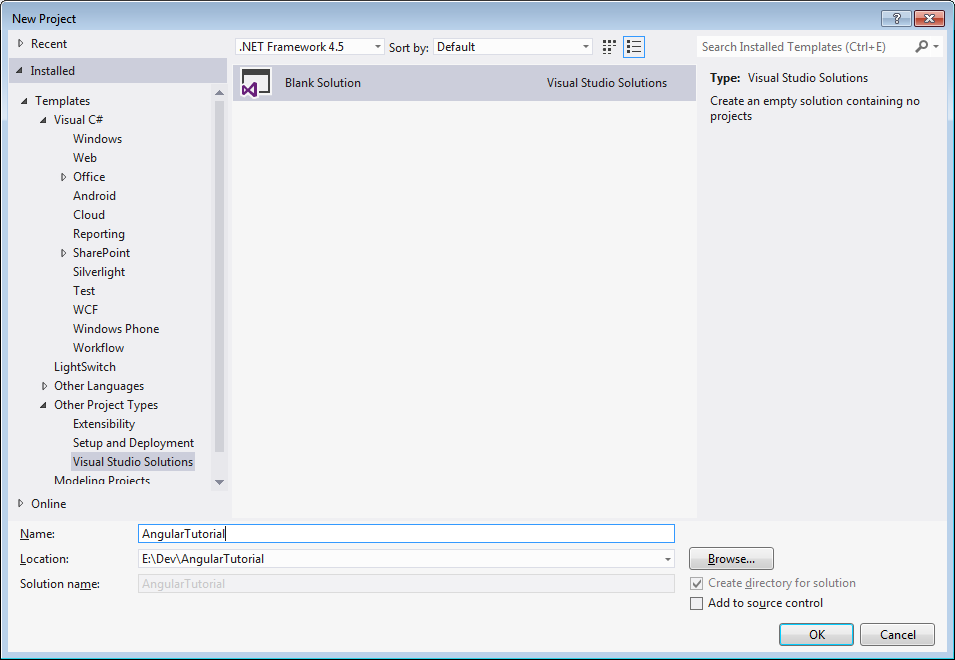
  2. Create a new Blank Solution named "AngularTutorial"
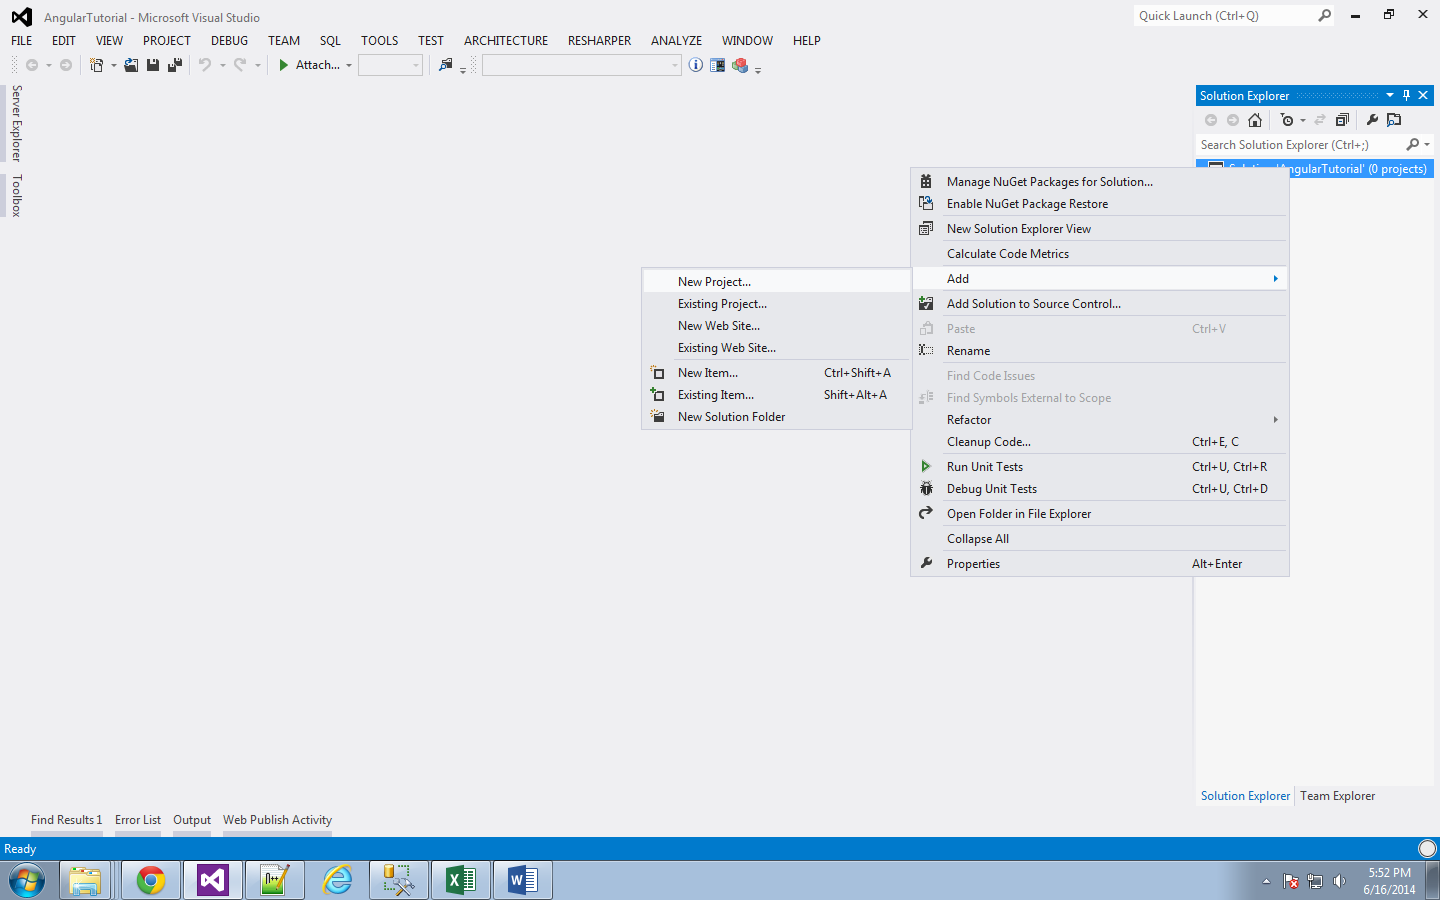
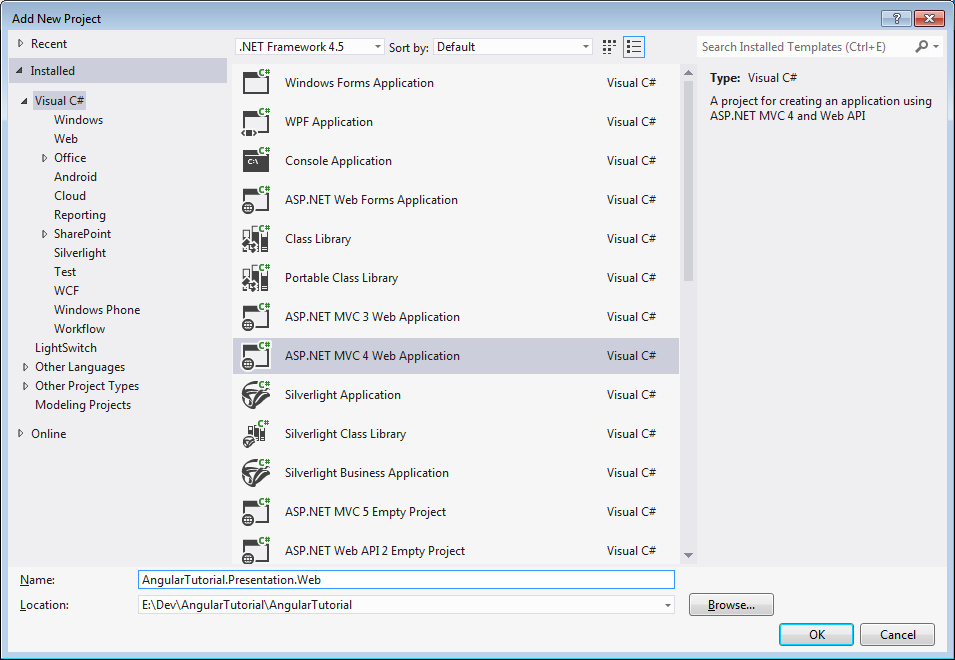
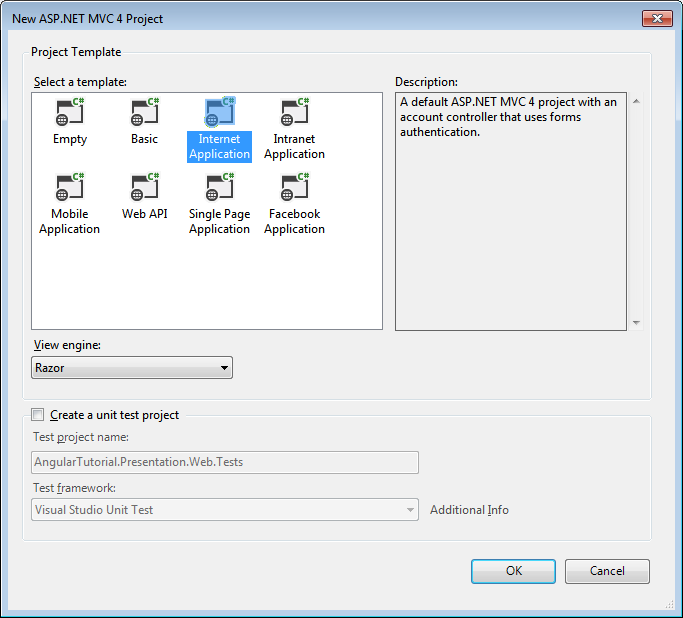
  3. Add a project named "AngularTutorial.Presentation.Web" to the blank solution
  4. Expand "AngularTutorial.Presentation.Web" and right-click "References"
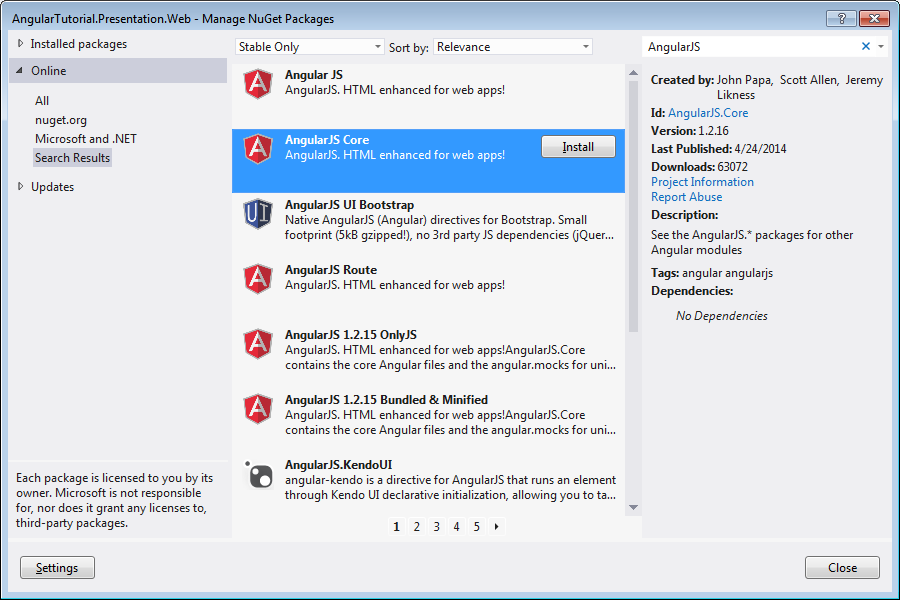
  5. Click "Manage NuGet Packages"
  6. In the left windowpane, select "nuget.org" or "All"
  7. In the upper right-hand corner of the window, type "AngularJS" and press [Enter]
  8. For this tutorial, only install AngularJS Core
  9. Expand "AngularTutorial.Presentation.Web > Views > Shared"
  10. Open _Layout.cshtml
  11. Edit the html tag in _Layout.cshtml to include "ng-app='angularApp'"
  12. Expand "AngularTutorial.Presentation.Web"
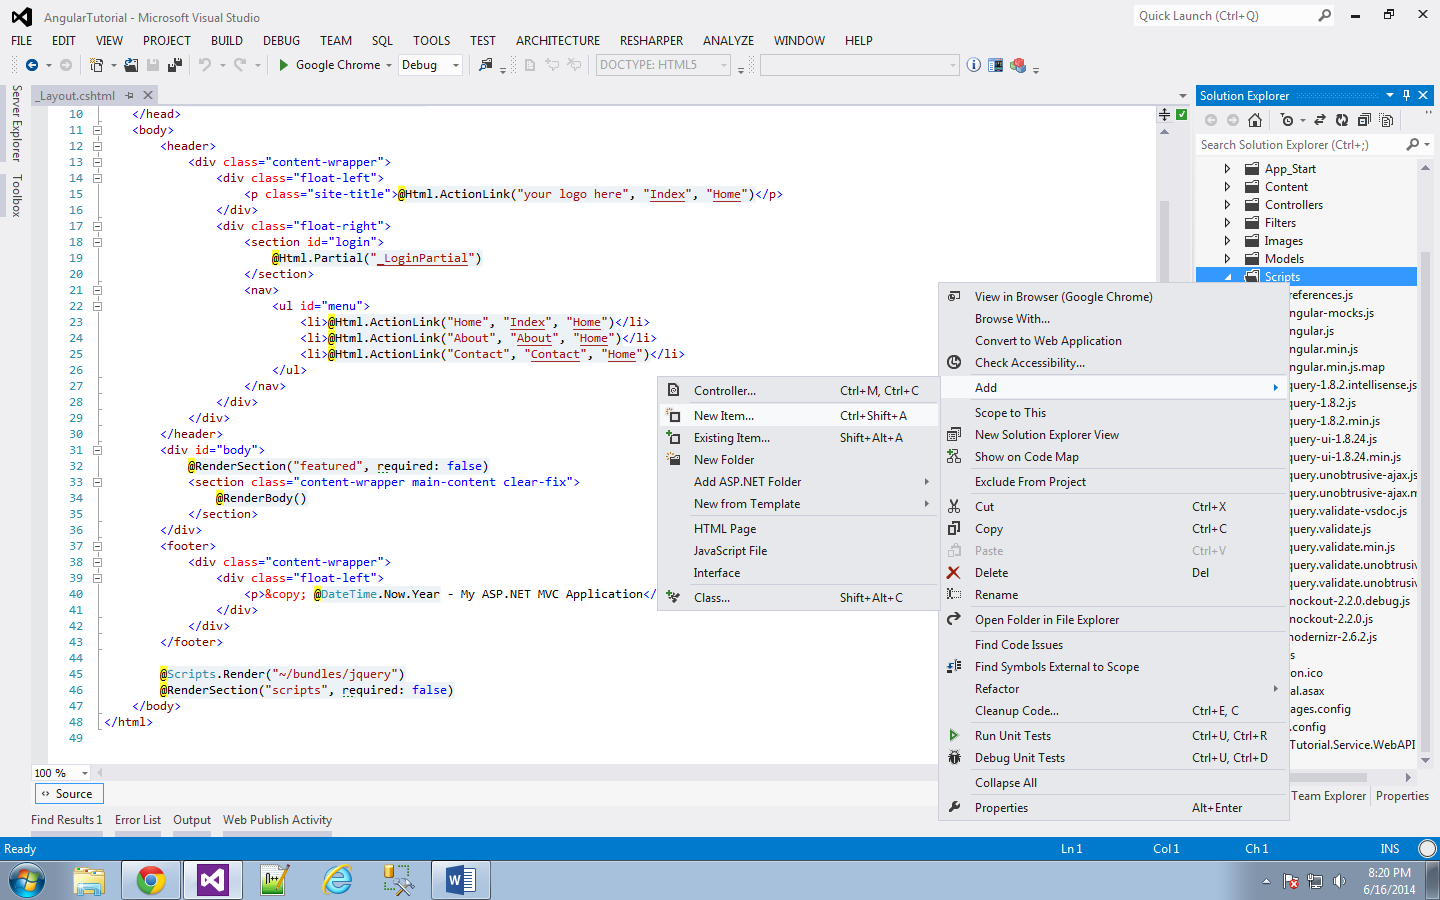
  13. Right-click "Scripts"
  14. Choose "Add > New Item..."
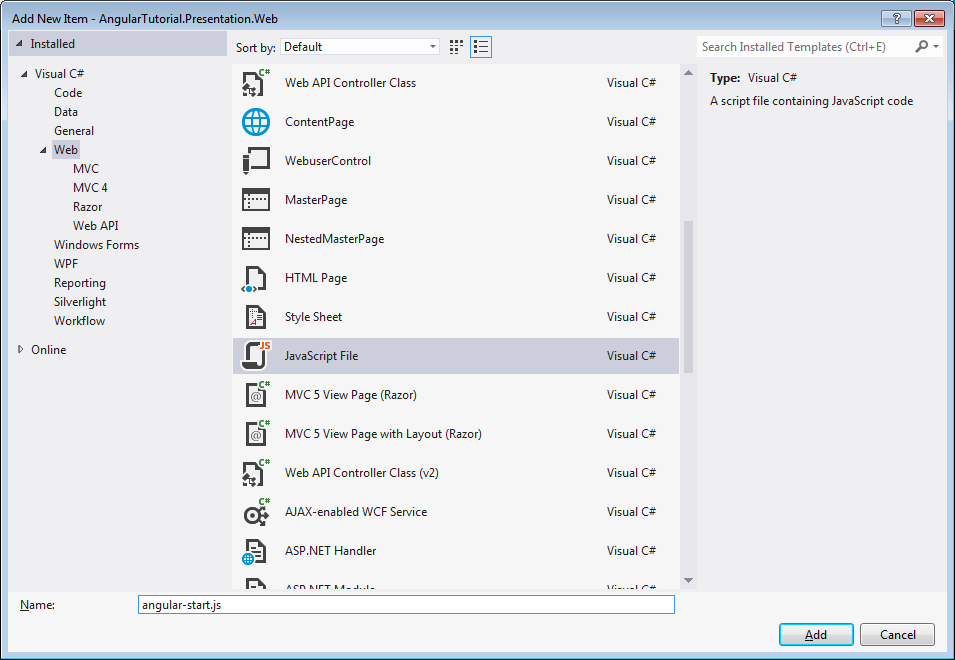
  15. Scroll down the list of items you can add and click "Javascript File"
  16. Change the name to "angular-start.js"
  17. Click the "Add" button
  18. Add the following line to the top of the blank file ("angular-start.js")
  19. Expand "AngularTutorial.Presentation.Web"
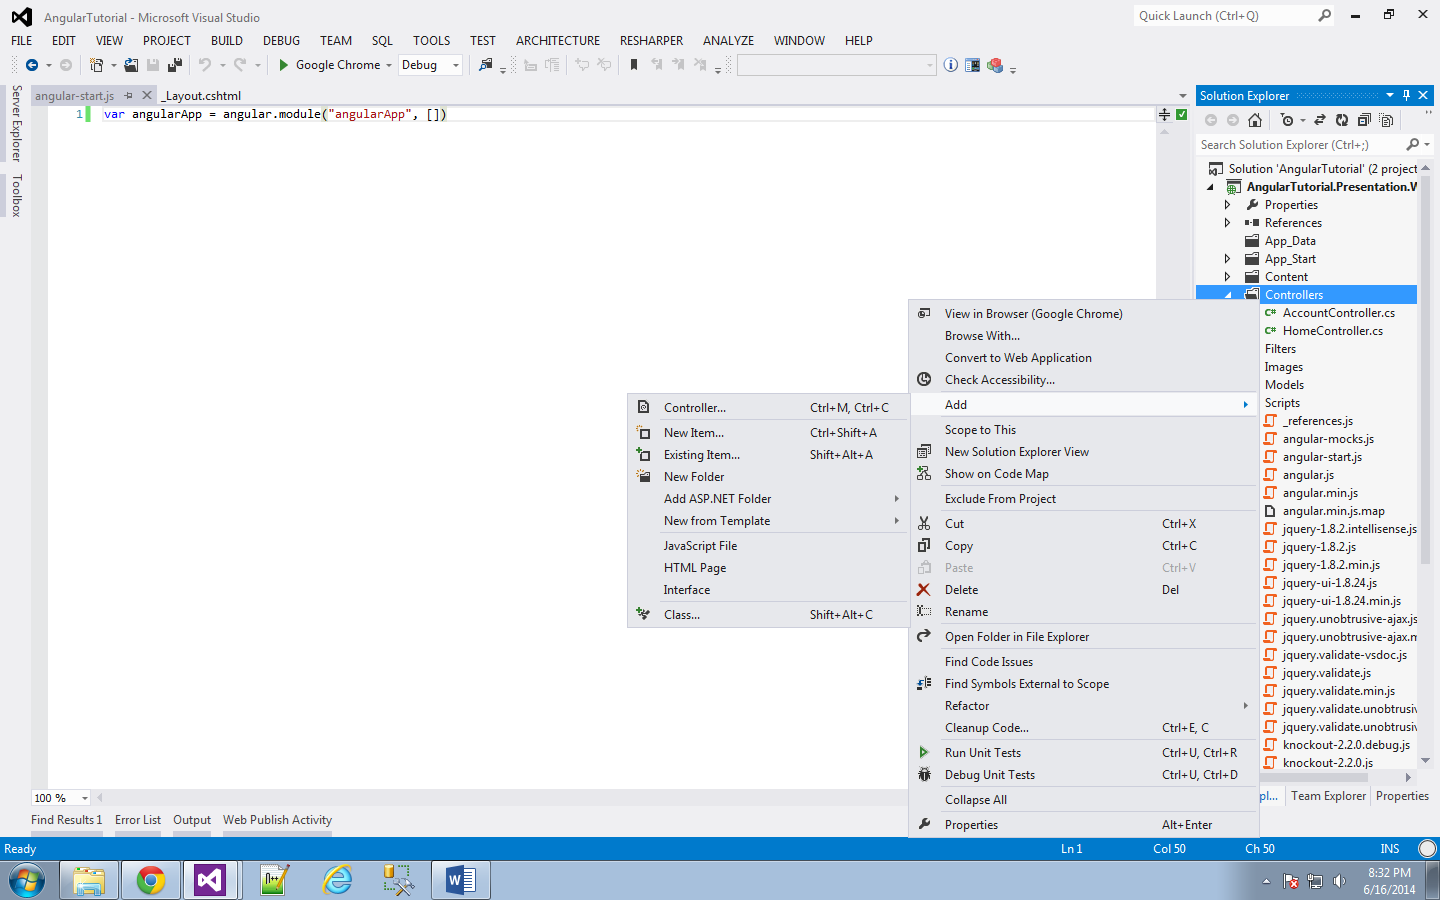
  20. Right-click "Controllers"
  21. Choose "Add > Controller..."
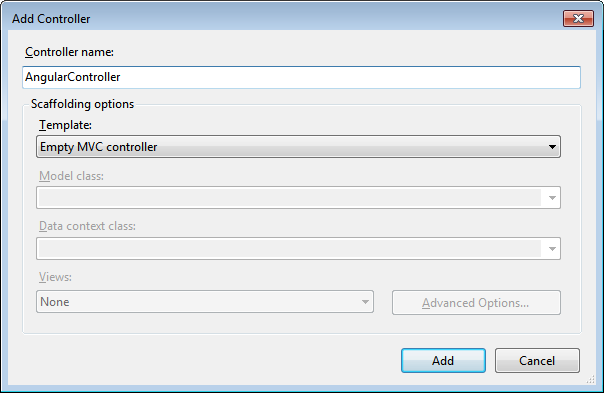
  22. Name the Controller "AngularController"
  23. Click the "Add" button
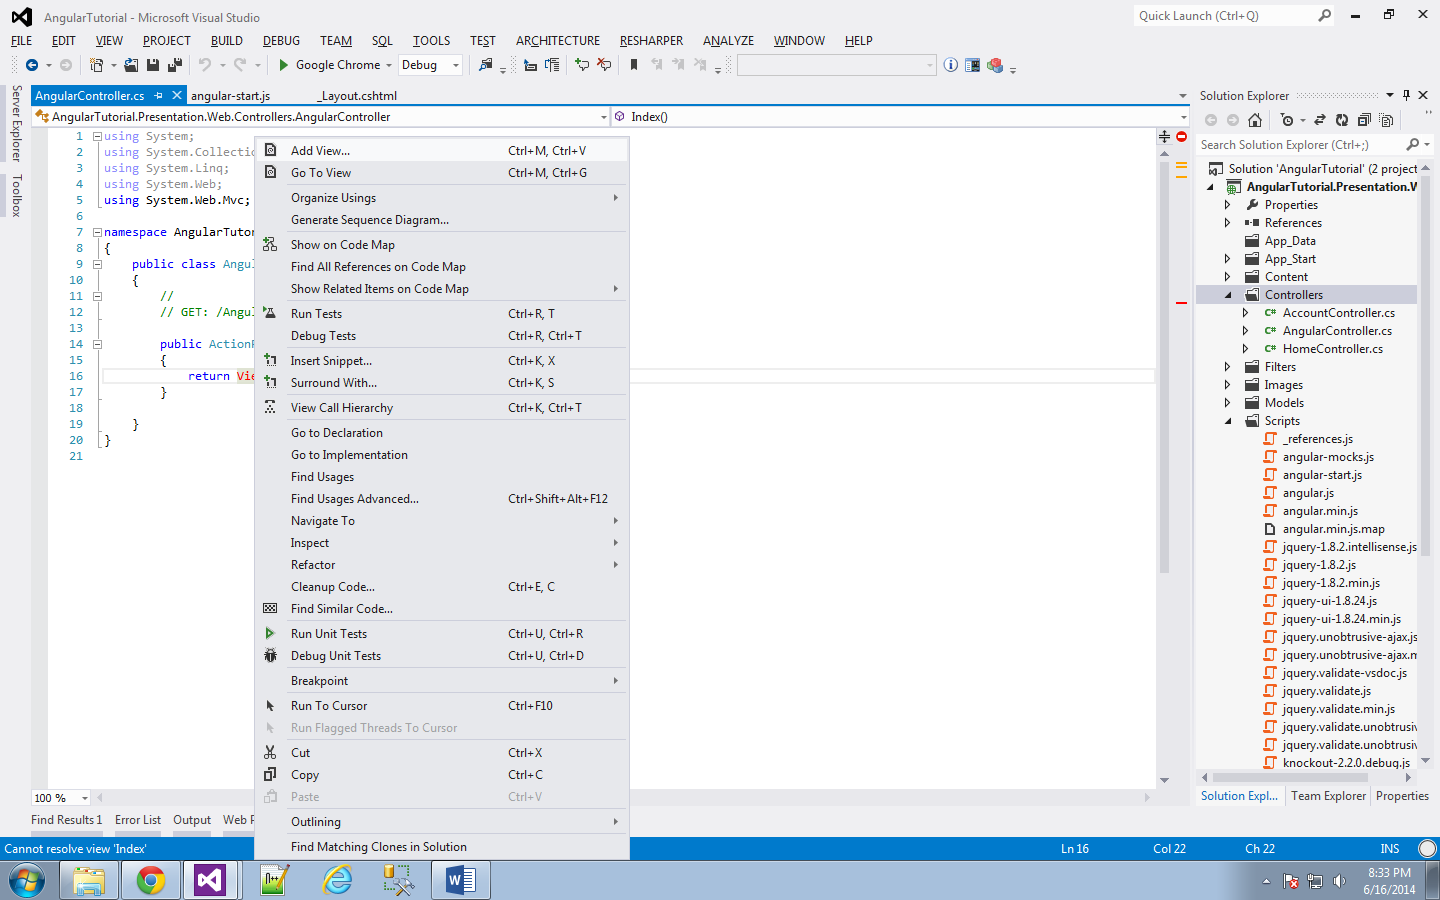
  24. In the open "AngularController.cs" file, right-click "View()" and choose "Add View..."
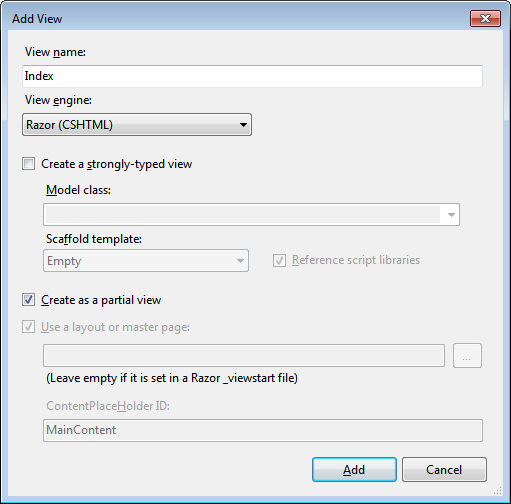
  25. Check the box marked "Create as a partial view"
  26. Click the "Add" button
  27. Add the following markup to the top of the blank file ("Index.cshtml")
  28. Expand "AngularTutorial.Presentation.Web"
  29. Right-click "Scripts"
  30. Choose "Add > New Item..."
  31. Scroll down the list of items you can add and click "Javascript File"
  32. Change the name to "angularController.js"
  33. Click the "Add" button
  34. Add the following line to the top of the blank file ("angularController.js")
  35. Expand "AngularTutorial.Presentation.Web > App_Start"
  36. Open "BundleConfig.cs"
  37. Somewhere in the RegisterBundles method, add the following code
  38. Go back to "_Layout.cshtml"
  39. After the jQuery bundle is added, add the new angular bundle
  40. Build the solution
  41. Start without debugging
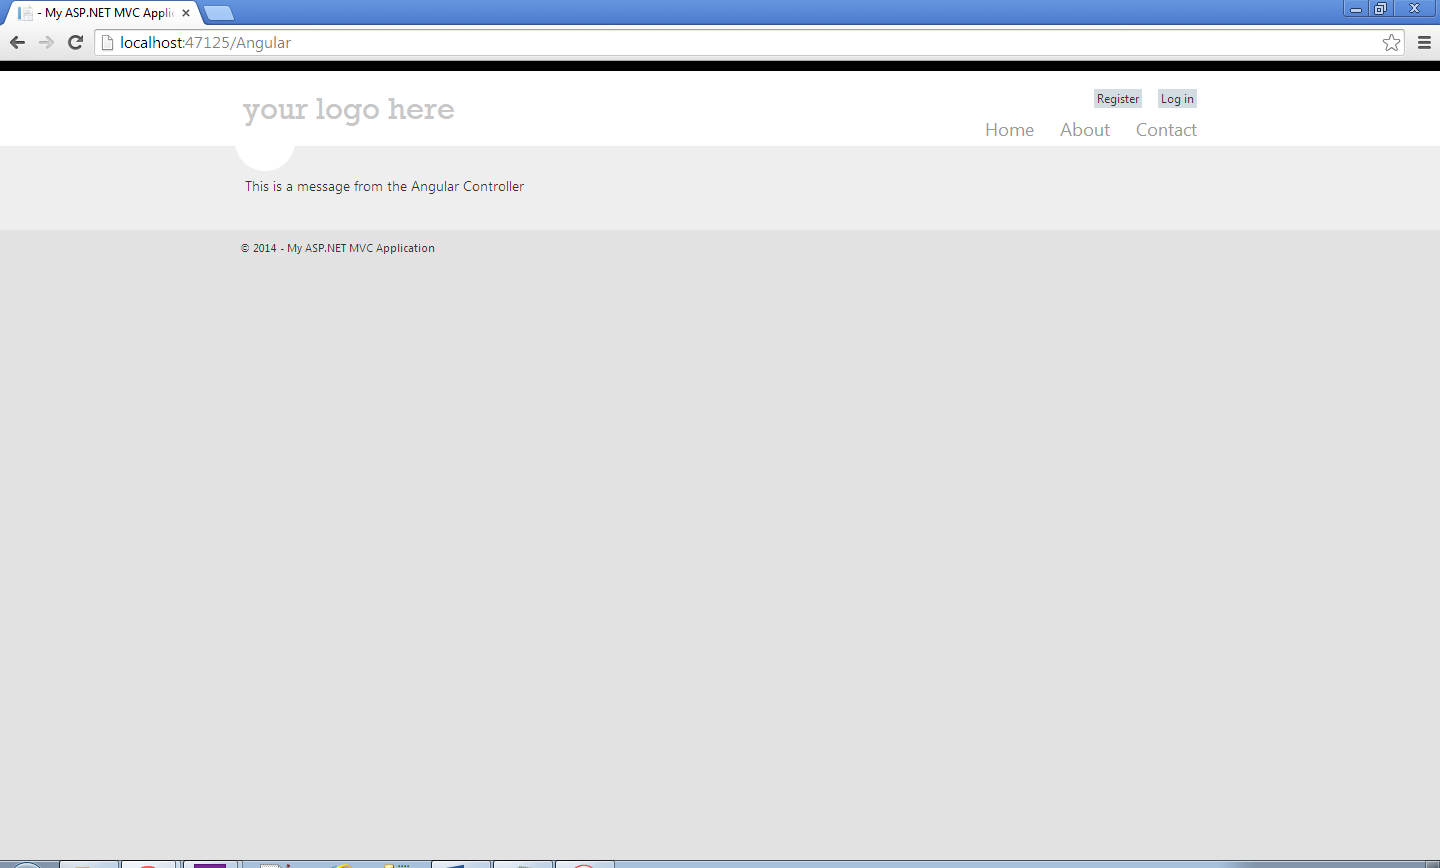
  42. Navigate to /Angular
    1. In my case it was http://localhost:47125/Angular
  43. Witness the fruits of your labor

Monday, June 2, 2014

Configuring TFS Work Item Limit

If you're using TFS with the scrum template you may have access to the web access portion, which includes a task board.  This board works as a virtual board where the agile team can see all open bugs, stories, and tasks in various states.  The team can move them, track them, estimate them, etc.  It's actually a pretty cool feature.  We recently found a limitation to the board that I didn't think we'd ever encounter, but we did.  Apparently the task board can have only 500 items on it at any given time, which is usually plenty.  On this particular project, though, we weren't really using the agile method so we had a lot more tasks than that.  When you hit the limit, TFS displays this message:


You might be able to imagine that it is disconcerting when you arrive at work in the morning to see this lovely screen.  The good news is there's a somewhat simple solution and you've found it here.  Without further ado, follow these steps to change the number of items available on the task board.


  1. Open a command prompt on your local machine
  2. Type in this command without the surrounding quotes: "cd %programfiles(x86)%\Microsoft Visual Studio 11.0\Common7\IDE"
  3. Press the key
  4. Type in this command without the surrounding quotes: "witadmin exportagileprocessconfig /collection:[collection] /p:[project name] > c:\tfsSettings.xml"
  5. Press the key
  6. Launch a new instance of Windows Explorer
  7. Navigate to C:\
  8. Open C:\tfsSettings.xml in Notepad
  9. Find the node named IterationBacklog and add an attribute to that node
    1. The name of the attribute will be workItemCountLimit
    2. The value of the attribute will be whatever limit you want to impose (I chose 800)
  10. Save C:\tfsSettings.xml
  11. Toggle back to the open command prompt
  12. Type in this command without the surrounding quotes: "witadmin importagileprocessconfig /collection:[collection] /p:[project name] /f:C:\tfsSettings.xml"
  13. Press the key
That should do it.  There are a couple of items to note about the instructions above, though.
  • You have to have rights on the project in order for this to work
  • You can find your project and collection names by using the admin portion of the web interface
    • In the upper right-hand corner of the page, click the gear icon
    • When the admin page opens, click "Control Panel" in the upper left-hand corner of the page
    • You will now be looking at the administration portion for the collection, click on the project in the tree beneath the collection
    • The main windowpane should now be displaying the Project Name, then the Collection, then the description of the project
    • The collection value to use in both commands above is the concatenation of the web interface URL with the collection name
      • If the URL of the web interface is http:\\widgetfactory\tfs\developmentgroup and the Collection Name on the admin page is Blogs, the value to use in the command would be http:\\widgetfactory\tfs\developmentgroup\blogs